A small backyard vegetable garden layout should make plants easy to reach, water, maintain, and harvest. Begin with the usable space and working routes, then decide how much planting area fits comfortably.
The most useful layout includes more than beds. It also accounts for paths, water access, mature plants, supports, and the household activities that still need to happen around the garden.
Affiliate disclosure: This article contains affiliate links. If you purchase through them, we may earn a commission at no additional cost to you.
Planning a garden within a wider backyard project? Explore The Self-Sufficient Backyard and compare its advertised ideas with your available space and practical goals.
1. Measure the Usable Space
Draw the yard’s fixed features before adding growing beds.
Include buildings, boundaries, gates, doors, taps, existing trees, permanent paths, and areas that must remain accessible.
Then measure the space you are considering for vegetables.
Record:
- Overall length and width.
- Narrow sections and obstructions.
- Gate openings.
- Distances from the water source.
- Routes used for carrying tools and materials.
- Space needed for other household activities.
Separate the property boundary from the edge of the proposed garden. They may be different lines.
Keep Existing Access Visible
Mark routes to sheds, washing lines, bins, utility equipment, and other frequently used places.
Do not depend on stepping through a planted bed to reach something behind it.
A layout that fits on paper still needs to work when plants have grown and you are carrying a watering can or harvest basket.
2. Map Sunlight Before Choosing Bed Positions
Observe the candidate area at different times of day.
Note where buildings, fences, and trees cast shade. Consider the intended growing season rather than assuming one day’s pattern applies throughout the year.
University of Maryland recommends a vegetable garden location receiving at least six hours of direct sunlight daily, preferably more, while checking for obstructions. Use crop-specific requirements when deciding what to grow.
Label areas on your sketch:
- Longer periods of direct sun.
- Partial shading.
- Areas needing further observation.
- Locations where structures or supports could create additional shade.
If you are still choosing crops, use our vegetable gardening guide for beginners alongside the layout.
3. Choose Bed Width Around Your Reach
A planting area should be narrow enough to tend without walking on it.
Iowa State University recommends beds approximately 3–4 feet wide when reached from both sides. Where access is available from only one side, it suggests about 1½–2 feet. Test your own reach before settling on dimensions.
Use temporary markers to outline a proposed bed. Try reaching the centre from each working side.
Choose a narrower width if you need to lean excessively or step into the growing area.
Our raised garden bed dimensions guide examines width, length, height, and paths in more detail.
Distinguish Outside and Inside Measurements
For framed beds, establish whether the advertised dimensions describe the outer footprint or internal growing space.
Use the outer footprint to plan clearance around the bed. Use internal measurements when calculating soil volume and planting space.
Our raised bed vegetable gardening guide explains the setup decisions.
4. Give Paths Their Own Space
Draw paths before deciding the final number of beds.
Check whether you can:
- Walk comfortably between mature plants.
- Kneel or use a seat where needed.
- Move the equipment you own.
- Carry materials without striking supports.
- Open gates and doors.
- Turn at the ends of beds.
University of Georgia Extension highlights convenient circulation and the value of connecting beds to a central access route. It also notes that very long beds can become inconvenient to walk around.
Choose path widths for the people and tasks involved. An example measurement is not an accessibility standard.
Three Layouts to Consider
Use these arrangements as starting points. Adapt them to your site rather than forcing the yard to match a diagram.
Layout 1: One Bed With Access Around It
A single bed provides a straightforward first setup.
Position it so you can reach both long sides and move around the ends. Leave space for watering equipment and supports.
Example Space Calculation
Suppose a nominal bed footprint measures 4 feet by 8 feet, with a 3-foot clear working path on every side.
The overall planning area becomes:
Width: 3 + 4 + 3 = 10 feet
Length: 3 + 8 + 3 = 14 feet
The nominal bed footprint is 32 square feet, while the complete planning area is 140 square feet.
This example shows why paths must be included from the start. It does not mean every bed requires this exact arrangement.
Choose a smaller bed or different path configuration where appropriate.
Layout 2: Two Beds With a Central Path
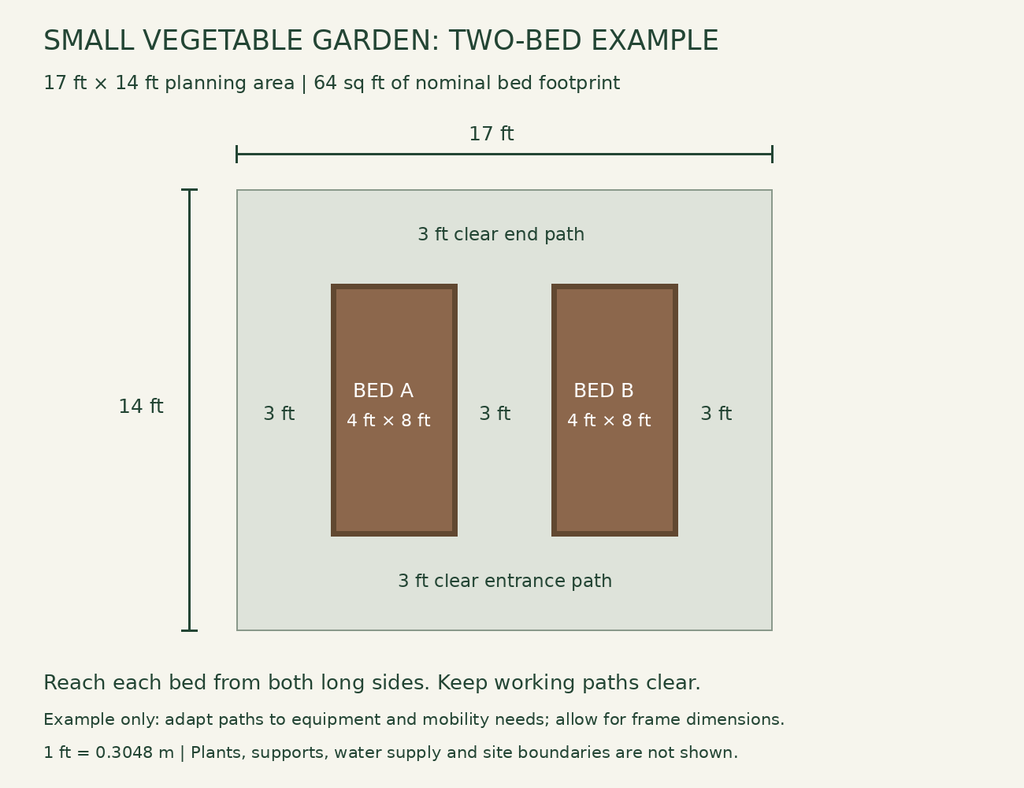
Two parallel beds can share a central working path while retaining access around the outside.
This arrangement gives you separate growing areas that can be labelled and recorded individually.
Example Two-Bed Layout
The diagram uses two nominal 4-by-8-foot bed footprints.
| Element | Measurement |
|---|---|
| Left outside path | 3 feet |
| First bed width | 4 feet |
| Central path | 3 feet |
| Second bed width | 4 feet |
| Right outside path | 3 feet |
| Total width | 17 feet |
| Bed length | 8 feet |
| Path at each end | 3 feet |
| Total length | 14 feet |
The two bed footprints total 64 square feet. The overall planning area is 238 square feet.
The diagram represents the horizontal arrangement. It does not specify soil depth, crop spacing, construction details, or accessibility compliance.
Check the Central Route
Mark the layout at full size before building.
Walk along the central path with the equipment you expect to use. Check the ends, corners, and approach from the house.
Allow additional space where equipment turning or mobility needs require it.
Layout 3: A Narrow Bed or Container Arrangement
A narrow strip may suit a bed reached from one side, while a paved area may suit containers.
Do not fill the strip simply because the space exists. First assess sunlight, drainage, access, and any restrictions near buildings or boundaries.
For containers, draw each container’s outer footprint and leave space for mature growth and maintenance.
Our container vegetable gardening guide covers the setup. Compare options in raised beds versus in-ground gardens before committing to construction.
Comparing several backyard arrangements? View The Self-Sufficient Backyard as an optional project resource. Check every example against your measurements, growing conditions, and routine.
5. Place Tall Crops and Supports Deliberately
Add trellises, cages, and other supports to the plan before assigning the remaining crop space.
Consider their mature height, anchoring, maintenance access, and likely shading.
For gardens in the Northern Hemisphere, University of Maryland recommends placing taller crops toward the north or west to reduce shading of shorter crops. Apply this as a starting principle and check the actual light pattern at your site.
Do not copy compass-based advice unchanged into a different hemisphere or a heavily shaded yard.
Account for Growth Beyond the Bed
A support may fit inside the frame while foliage and fruit extend into a path.
Leave enough room to harvest and inspect the plants. Avoid placing a support where it prevents you from reaching the rest of the bed.
Our vertical vegetable gardening guide explores crop selection and support planning.
6. Include Water Access in the Drawing
Mark the water source and the route to each growing area.
Check whether a hose can reach without crossing a frequently used doorway or creating an awkward working route.
If using irrigation, show:
- The supply connection.
- Main distribution route.
- Connections serving each bed.
- Equipment that needs inspection.
- Areas where maintenance access must remain clear.
Our vegetable garden watering guide explains how to assess watering needs. For system setup, read drip irrigation for vegetable gardens.
7. Plan Crops at Mature Size
Once the beds and paths work, allocate crops using the spacing guidance for the actual varieties.
Avoid treating a small seedling’s current size as its final footprint.
For each crop, record:
- Intended location.
- Variety.
- Planting window.
- Spacing.
- Support requirements.
- Expected harvest period.
- What may follow it.
The Florida vegetable garden design guide recommends including crop location, amount, and planting dates in the plan. The planning method is useful elsewhere, while planting dates must come from guidance for your own region.
Use our 4-by-8 raised bed layout guide for a dedicated planting example.
8. Plan the Next Use of Each Bed
A garden layout changes through the season.
Label beds and record which crops occupy them, when space may become available, and what could follow.
Our succession planting guide helps organize these transitions. Use the vegetable planting calendar guide to align them with local planting windows.
Keep the first version flexible. You may discover that a crop stays longer than expected or that another location is easier to maintain.
Test the Layout Before Buying Materials
Outline the full arrangement using string, stakes, or other temporary markers.
Then practise ordinary tasks:
- Enter from the usual direction.
- Carry a basket along the paths.
- Reach the centre of each bed.
- Walk around the ends.
- Check the watering route.
- Imagine supports and mature plants in position.
- Open nearby gates and doors.
Ask other people who will maintain the garden to test it too.
Adjust the outline before purchasing permanent components.
Common Small-Garden Layout Mistakes
Counting Only Bed Area
Include paths, approaches, supports, and working space.
Making Beds Too Wide
Test comfortable reach rather than relying only on standard material sizes.
Crowding Paths With Containers
Measure the remaining clear route after containers and mature plants are included.
Ignoring Seasonal Shade
Observe sunlight during the period when crops will be growing.
Planning Irrigation After Planting
Include the supply route and maintenance access in the original drawing.
Building Every Possible Bed Immediately
Start with a manageable area and leave room for changes.
Your Layout Checklist
Before construction or planting, confirm that you have:
- Measured the usable area.
- Recorded fixed features and necessary household routes.
- Observed sunlight.
- Chosen reachable bed widths.
- Included suitable paths and turning space.
- Distinguished bed footprint from internal growing area.
- Planned supports and mature crop space.
- Marked water access.
- Considered seasonal crop changes.
- Tested the arrangement at full size.
Make the Garden Comfortable to Use
A useful small backyard vegetable garden layout balances planting space with the access needed to care for it.
Begin with accurate measurements, reachable beds, clear paths, and convenient water access. Add crops only after the working arrangement makes sense.
Looking for ideas for the next stage of your backyard? Explore The Self-Sufficient Backyard and compare its advertised projects with your plans. Our research-based review explains its scope and purchasing considerations.
Build a layout you can maintain comfortably, then refine it through experience.