Raised bed vegetable gardening gives you a defined growing area that you can plan around your available space, preferred working height, and planting goals. A successful setup needs more than a frame: location, access, soil, water, and maintenance all deserve attention before you begin filling the bed.
Start with one manageable bed. Work through the design, estimate the full cost, and choose crops suited to your growing conditions. You can expand after learning how the first bed performs.
Affiliate disclosure: This article contains affiliate links. If you purchase through them, we may earn a commission at no additional cost to you.
Planning raised beds as part of a larger backyard project? Explore The Self-Sufficient Backyard and compare its advertised projects with the improvements you want to make.
What Is a Raised Vegetable Bed?
A raised bed is a growing area elevated above the surrounding ground. It may be a mound without a frame or a bed contained by wood, metal, masonry, or another suitable border.
This guide focuses on framed beds placed at ground level. An elevated planter with a bottom and legs is a different structure: its drainage, soil capacity, and load-bearing requirements need separate consideration.
Before choosing a framed bed, compare it with your other options. Our raised beds versus in-ground gardens guide helps you assess which arrangement suits your yard.
1. Choose the Location Before the Bed
Mark out the proposed location before buying a kit or construction materials.
Observe sunlight, water access, drainage, and how you move through the yard. Consider the space around the finished bed as carefully as the planting area itself.
A useful location should allow you to:
- Reach the growing area comfortably.
- Bring water to the bed.
- Carry soil, tools, and harvested produce.
- Maintain surrounding paths.
- Inspect and repair the frame.
- Install supports without obstructing access.
Choose a site with sunlight suited to your intended crops. University of Delaware Extension recommends a sunny location with convenient water access and attention to existing site conditions.
For help arranging more than one growing area, explore our small backyard vegetable garden layout guide.
Check What Is Underneath
A bed over usable garden soil presents different questions from a bed over paving, compacted ground, or soil with a potentially problematic history.
Do not assume that adding a frame resolves every underlying issue. Identify what you need to investigate before deciding on preparation, soil depth, or any separation system.
Our vegetable garden soil guide introduces soil assessment and testing.
2. Choose a Width You Can Reach Across
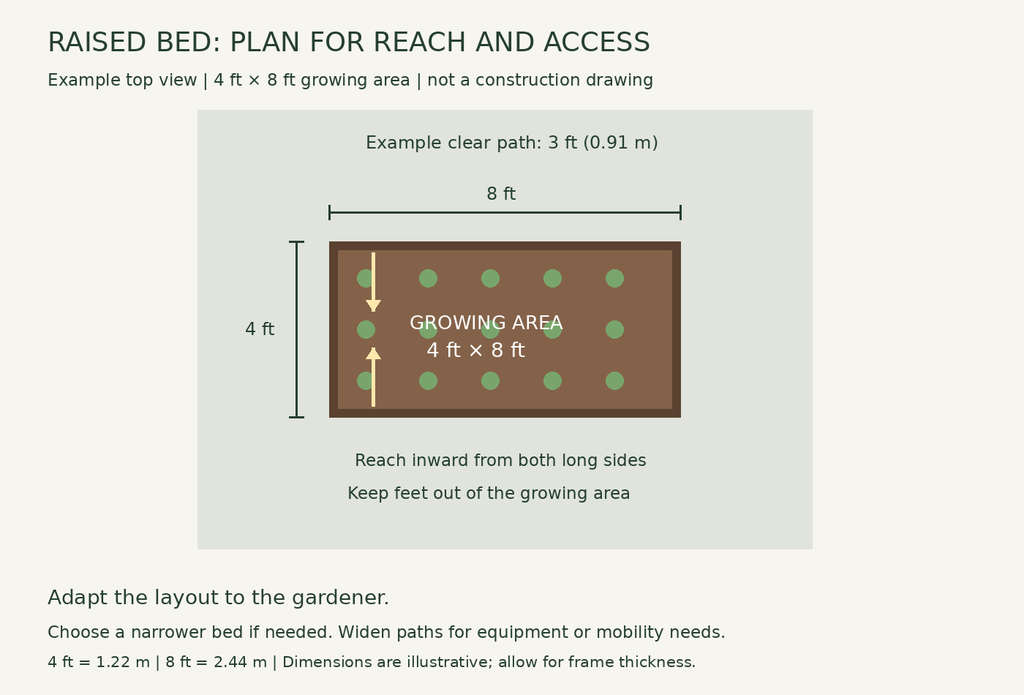
Bed width should suit the person tending it.
Iowa State University Extension recommends beds approximately 3–4 feet wide when accessible from both sides. For beds reached from only one side, it recommends a narrower width of about 1½–2 feet. These are starting points: test your own comfortable reach before building.
Mark the proposed edges with string or temporary markers. Practise reaching the centre from outside the bed without stepping into the growing area or straining.
Choose a narrower bed if necessary.
Leave Useful Paths
Paths need to accommodate the work you will do. Check whether you can carry a basket, kneel, move equipment, and turn comfortably.
The accompanying diagram shows an example 3-foot path. Treat it as a planning example rather than an accessibility specification. Your equipment and mobility needs may require more space.
For detailed sizing decisions, see raised garden bed dimensions.
3. Select Length and Height Together
Length affects how easily you can walk around the bed, the materials required, and the amount of soil needed.
Choose a length that fits the site without creating inconvenient routes. A longer bed may use space efficiently but also make it harder to move between its two sides.
Height deserves similar consideration.
Frame Height Is Not the Same as Rooting Depth
Where a bed is open to suitable soil below, roots may use that underlying soil. A bed above a hard surface or unsuitable ground requires a different design.
Extension guidance varies with the intended setup. University of Maryland describes low raised beds, while University of Delaware recommends at least a foot of growing depth for its framed-bed approach. This variation is a reason to design around your crops and site rather than choose one universal depth.
Before deciding, establish:
- Whether roots can use the ground beneath the bed.
- What growing depth your intended crops need.
- What working height suits you.
- How much filling material you can afford.
- Whether the frame is designed to hold that depth of soil.
4. Compare Materials Before Purchasing
Choose materials using more than appearance.
Compare durability, purchase price, assembly requirements, edges, replacement parts, and the supplier’s intended use.
| Material option | Questions to investigate |
|---|---|
| Wood | What species or treatment is used? What maintenance and service life should you expect? |
| Metal kit | Are edges protected? Are fittings, bracing, and coatings suitable for the intended use? |
| Masonry | What foundation, stability, and construction work are required? |
| Reused materials | Can you establish their previous use, condition, and suitability? |
Avoid unidentified salvaged materials when you cannot establish what they contain or how they were used.
Our raised bed materials guide examines the choices in more detail.
Include Assembly and Repairs in the Budget
A low purchase price may leave out fasteners, corner fittings, bracing, delivery, or installation work.
For a kit, read the complete instructions before preparing the site. Confirm the finished dimensions and required supporting components.
5. Prepare the Site and Assemble the Bed
Set out the bed and paths at full size before construction.
Check the measurements, access routes, and relationship to doors, fences, taps, and other features. Make adjustments while moving the outline is still easy.
Then prepare the site according to its conditions and the bed design.
For an open-bottom bed over usable soil, investigate compaction, existing vegetation, drainage, and soil condition. University of Maryland’s guidance describes preparing and improving the soil beneath suitable raised beds rather than treating the frame as an isolated container.
Do Not Automatically Add a Bottom Liner
Decide what a proposed liner or barrier is intended to achieve. Weed suppression, burrowing-animal exclusion, drainage, and separation from unsuitable soil are different problems.
Choose a solution for the actual problem, checking how it affects the complete bed design. Seek site-specific advice where soil contamination or structural loading is involved.
After assembly, inspect corners, fasteners, bracing, and exposed edges before adding heavy filling material.
Considering several garden structures or backyard systems? View The Self-Sufficient Backyard as an optional source of project ideas, then assess each project’s materials, costs, and suitability separately.
6. Calculate the Soil Volume
Estimate the filling volume before ordering soil.
Use the bed’s internal dimensions and your intended fill depth:
Length × width × fill depth = volume
Keep all measurements in the same units.
For example, an internal growing space measuring 4 feet by 8 feet, filled to a depth of 1 foot, requires:
4 × 8 × 1 = 32 cubic feet
To convert cubic feet to cubic yards:
32 ÷ 27 ≈ 1.19 cubic yards
UF/IFAS Extension uses this length-by-width-by-height calculation and the conversion of 27 cubic feet per cubic yard.
This example describes filling volume, not a recommendation that every bed should be 1 foot deep. Account for the actual internal dimensions and any deliberate space below the frame’s top edge.
Check What You Are Buying
Ask suppliers about ingredients, intended use, delivery quantities, and available testing information.
Do not assume products with similar names have identical composition.
Use our raised bed soil mix guide to investigate filling materials and quantities. Compost and fertilizer also serve different purposes; our compost versus fertilizer guide explains the distinction.
7. Plan Watering Before Planting
Decide how water will reach every part of the bed.
Check hose routes, connections, and whether your chosen equipment can operate as intended. If installing irrigation, test coverage before the plants become large enough to obstruct access.
Raised beds can dry more quickly than surrounding garden soil, so include regular moisture checks in your routine rather than assuming the bed will behave like nearby ground.
Our vegetable garden watering guide helps you assess changing conditions.
For equipment choices, explore:
Keep connections accessible for inspection and maintenance.
8. Plan the Crops at Mature Size
Sketch the planting arrangement before placing seeds or young plants.
Use the spacing guidance for the specific crops and varieties you choose. Allow for supports, harvesting access, and mature growth.
Check:
- Which plants need trellises or stakes.
- Whether supports will block a path.
- Whether you can reach the harvest.
- How neighbouring plants will share the space.
- When each crop is expected to leave the bed.
Our 4-by-8 raised bed layout guide provides a dedicated planning example.
If this is your first growing season, use vegetable gardening for beginners alongside the bed setup.
9. Maintain the Growing Area and Frame
Include the bed itself in your regular garden checks.
Inspect the frame for movement, loose fittings, damage, and sharp edges. Keep paths usable and make sure irrigation connections remain accessible.
For the growing area, record:
- Planting dates and varieties.
- Watering observations.
- Amendments and fertilizers applied.
- Crop problems and responses.
- Harvests and unused produce.
- Changes you want to make next season.
Avoid adding products simply because a calendar says it is time. Base amendments on the growing medium’s condition, testing where appropriate, and crop requirements.
Common Raised Bed Mistakes
Choosing Width by Available Lumber Alone
Check your reach before settling on dimensions. Convenient material sizes do not guarantee a comfortable bed.
Forgetting the Paths
Include access space in the layout and material estimate from the beginning.
Ordering Soil From External Dimensions
Frame thickness reduces internal space. Calculate the actual volume you intend to fill.
Treating Every Site the Same
Underlying soil, hard surfaces, drainage, and site history can change the design requirements.
Planting Before Testing Irrigation
Check water delivery while connections and growing areas are easy to inspect.
Expanding Before Evaluating the First Bed
Use one season’s observations to guide additional beds, materials, and planting choices.
Raised Bed Setup Checklist
Before planting, confirm that you have:
- Observed the site and considered its history.
- Marked the bed and paths at full size.
- Tested comfortable reach.
- Chosen suitable dimensions and materials.
- Established the required growing depth.
- Prepared the underlying site appropriately.
- Assembled and inspected the frame.
- Calculated filling volume.
- Investigated soil ingredients and quality.
- Tested your watering method.
- Planned crops and supports.
- Set aside time for maintenance.
Build One Bed You Can Use Well
A useful raised bed makes growing and maintenance practical. Choose dimensions you can reach, leave adequate working space, and plan soil and watering before planting.
Start with a manageable setup and record how it performs. That experience will help you decide whether to expand, change the design, or concentrate on improving the bed you already have.
Ready to explore further backyard projects? Take a look at The Self-Sufficient Backyard and compare its advertised contents with your next steps. Our research-based review explains the purchasing questions to consider.
Build thoughtfully, plant to a realistic plan, and use the first season to learn what works in your yard.